
Blog
Hooded Crochet Poncho Pattern (Beginner-Friendly, Step-by-Step)

Hooded Crochet Poncho Pattern (Beginner-Friendly, Step-by-Step)
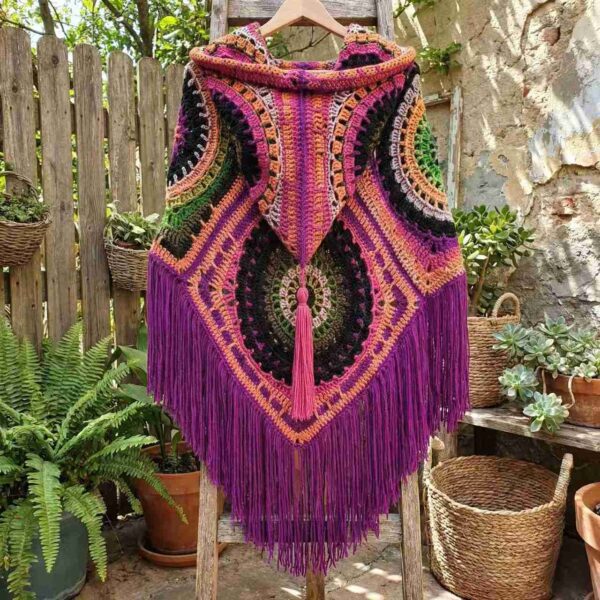
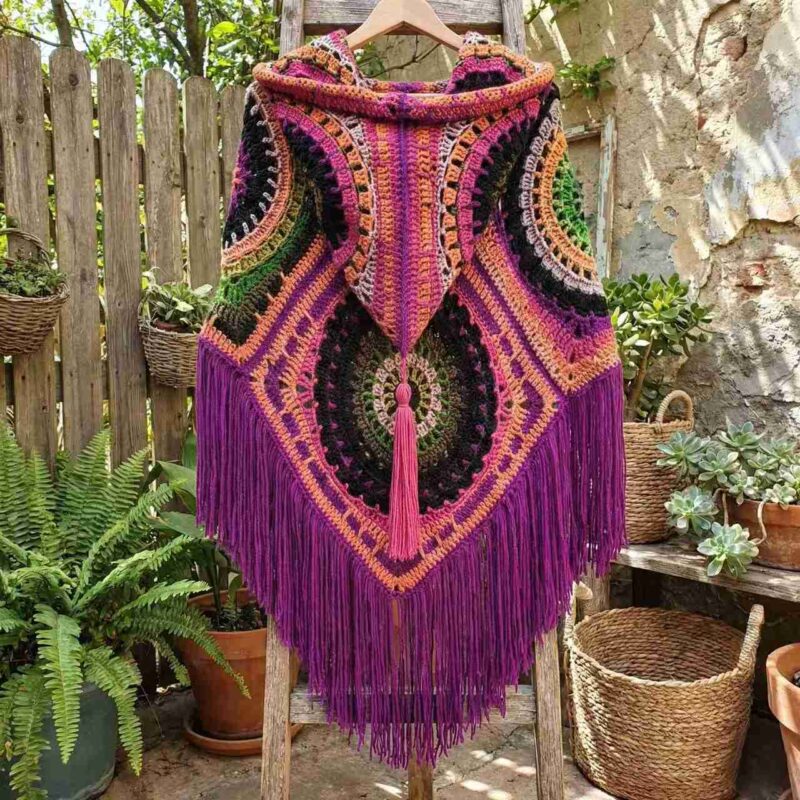
If you’re looking for a wearable crochet project that feels cozy but still looks special, a hooded poncho is a great choice. It’s warm, it’s easy to layer, and it doesn’t need complicated shaping like sleeves. Also, this poncho is worked mostly in the round, so you can relax and build it up round by round.
On this blog, I share free crochet tutorials and patterns, and I also sell a small number of finished crochet pieces. If you’re newer to crochet and want a quick warm-up project first, you can try a smaller item like a mushroom or leaf pattern on my site. However, if you’re ready for something bigger, let’s jump into this hooded poncho.
If you’re new to crochet, it sometimes helps to start with a smaller project first. I have two beginner mushroom tutorials on the blog — Mushroom Tutorial #1 and Mushroom Tutorial #2. Once you feel comfortable with basic stitches, come back here and we’ll build the poncho round by round.

Before you start (materials + quick notes)
Yarn: Choose a yarn that feels soft on skin. Medium-weight yarn works well for most ponchos.
Hook: Use the hook size recommended on your yarn label.
Other tools: scissors, yarn needle, stitch marker (very helpful for rounds).
Skill level: adventurous beginner.
You don’t need advanced shaping, but you should be comfortable with basic stitches and counting spaces.
How to read the chart (recommended)
If you’re using the stitch chart, it helps to keep a symbol key nearby.
✅ Where to insert your images
-
Put the stitch chart image right before the “Pattern Instructions” section.
-
Put the symbol chart / abbreviation image right above the “Abbreviations” section.
This way, readers see the visual support exactly when they need it.
Abbreviations
-
Ch – chain
-
Hdc – half double crochet
-
Dc – double crochet
-
Tr – triple crochet
-
St(s) – stitch(es)
-
Sl st – slip stitch
-
Sk a st – skip a stitch
-
Sp(s) – space(s)
-
Repeat – repeat the instruction in brackets
Tip: At the end of each round, I keep the stitch counts, because it’s an easy way to check if you’re still on track.
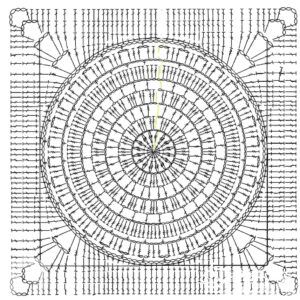
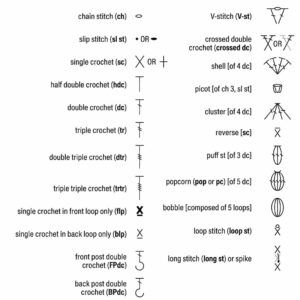
Pattern Instructions
Foundation (make a ring)
First, ch 7. Then sl st into the first chain to form a ring.
This ring is the center of your poncho.
Round 1 (build the first circle)
Now ch 3 (this does not count as a stitch).
Next, work 24 tr around the ring.
Finally, sl st into the top of the first tr.
Stitch count: 24 tr.
Beginner note: If the center looks a bit loose, that’s normal. It tightens up as you add more rounds.
Round 2 (make chain spaces)
To start, ch 7 (this counts as a dc + ch 4).
Then skip 1 stitch, and repeat this pattern around:
-
dc in next stitch, ch 4, skip 1 stitch
At the end, finish with ch 4, skip the last stitch, and sl st into the 3rd ch of the beginning chain.
Count: 12 dc, 12 ch-4 spaces.
Why this round matters: these chain spaces are what you’ll fill later, so try to keep your chain tension consistent.
Round 3 (fill spaces with 5 dc groups)
Slip stitch into the first ch-4 space.
Then ch 3 (counts as dc), and work 4 dc in the same space.
After that, ch 1, and repeat around:
-
5 dc in next ch-4 space, ch 1
Join with sl st into the 3rd chain of the beginning ch-3.
Count: 60 dc, 12 ch-1 spaces.
Round 4 (taller round + new spaces)
Start with ch 6 (counts as tr + ch 2).
Then work tr in the next ch-1 space, ch 4, and keep repeating the round’s pattern as written:
(tr in same ch-4 space, ch 2, tr in next ch-1 space) repeated around, with the joins exactly as your original instructions.
Count: 24 tr, 12 ch-4 spaces, 12 ch-2 spaces.
Beginner note: This round looks messy while you work it, but it becomes clear in the next round.
Round 5 (3 dc + 4 dc groups)
Slip stitch into the first ch-2 space.
Then ch 3 (counts as dc), and work 2 dc in the same space.
Next do ch 1, then 4 dc in the next ch-4 space, ch 1.
After that, repeat around:
-
3 dc in next ch-2 space, ch 1, 4 dc in next ch-4 space, ch 1
Join with sl st into the 3rd chain of the beginning ch-3.
Count: 84 dc, 24 ch-1 spaces.
Round 6 (turn it back into big spaces)
Slip stitch into a ch space.
Then ch 7 (counts as dc + ch 4).
After that, repeat around:
-
dc in next ch-1 space, ch 4
Join with sl st into the 3rd chain of the beginning chain.
Count: 24 dc, 24 ch-4 spaces.
Round 7 (another “5 dc” round, bigger)
Slip stitch into the first ch-4 space.
Then ch 3 (counts as dc), and do 4 dc in the same space.
Next ch 1, and repeat around:
-
5 dc in next ch-4 space, ch 1
Join as usual.
Count: 120 dc, 24 ch-1 spaces.
Round 8 (switch to sc + chain loops)
Slip stitch into the ch-1 space.
Then ch 1, and make sc in the same space.
Next ch 5, and repeat around:
-
sc in next ch-1 space, ch 5
Join to the top of the beginning sc.
Count: 24 sc, 24 ch-5 spaces.
Round 9 (fill each loop with 5 dc again)
Slip stitch into the first ch-5 space.
Then ch 3 (counts as dc), and work 4 dc into the same space.
Next ch 1, and repeat around:
-
5 dc in next ch-5 space, ch 1
Join.
Count: 120 dc, 24 ch-1 spaces.
Round 10 (bigger chain loops)
Slip stitch into the ch-1 space.
Then sc in the same space, ch 6, and repeat around:
-
sc in next ch-1 space, ch 6
Join.
Count: 24 sc, 24 ch-6 spaces.
Round 11 (the shaping / texture round)
This is the “big” round, so go slowly.
Start by slip stitching into the first ch-6 space.
Then ch 4 (counts as tr), and work:
-
3 tr in same space, ch 3, 4 tr in same space
-
then 7 dc in next ch-6 space
-
then 7 hdc in next 3 ch-6 spaces
-
then 7 dc in next ch-6 space
Repeat the full sequence around as written, then join to the 4th chain of the beginning ch-4.
Count: 4 ch-3 spaces, 32 tr, 56 dc, 84 hdc.
Tip: If your stitch counts match here, the rest usually goes smoothly.
Round 12 (build height and smooth the shape)
Now work the round exactly like this:
Ch 4 (counts as tr), tr in next 3 sts, 9 tr in ch-3 space, tr in next 6 sts, dc in next 31 sts.
Repeat the sequence around as written, then join.
Count: 84 tr, 124 dc.
Round 13 (single crochet finishing round)
This round makes the edge look clean and wearable.
Start with ch 1, sc in the same stitch, then sc in next 7 stitches.
In the next stitch (this should be the middle of the 9-tr group), work 3 sc in the same stitch.
After that, repeat around:
-
sc in next 51 sts, 3 sc in next st
Finish the round, then join.
Count: 216 sc.
Final touches (make it wearable)
At this point, weave in your ends.
Next, block the poncho lightly if you want it to drape better (blocking helps the rounds settle).
After that, you can add tassels or fringe if you like. A decorative button near the neckline can also look good and help it sit nicely.
Optional: Simple hood add-on (beginner method)
You called this a hooded poncho, but the round instructions above mainly build the poncho body. So if you want a hood and you don’t have extra hood steps, here is a simple method that works well:
-
First, decide where the “front” is. Then mark a neck opening area at the top edge (usually about 25–35 cm wide for adults, but you can adjust).
-
Next, use your yarn to seam a short section at the top edge so the poncho forms a neckline opening.
-
After that, pick up stitches evenly around the neckline opening and crochet the hood in rows:
-
Row 1: sc or hdc evenly around the neckline opening, then turn.
-
Row 2+: keep working hdc rows until the hood is tall enough (usually 28–35 cm, depending on size).
-
-
Finally, fold the hood in half and seam the top to close it.
-
If you want, add a simple border around the hood opening (sc or reverse sc) so it looks finished.
This hood method is easy, and it also lets you control the fit.
Pattern credit / reference:
This is my rewritten, beginner-friendly version with extra explanations, smoother wording, and step-by-step guidance. If you’d like to see the original pattern that inspired this project, you can find it here: Original hooded poncho pattern reference.