Blog
Crochet Leaf Pattern: 2 Essential Styles for Your Amigurumi Forest Clock

Stuson Tutorial – Step-by-Step Amigurumi Tutorial
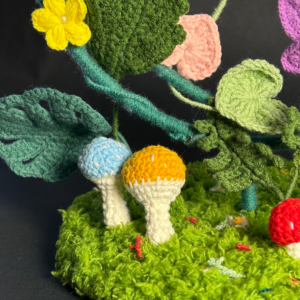
Let’s keep going with this massive Forest Clock Project. After sharing the Mushroom Crochet Tutorial last time, many of you said that 1:1 assembly method was a total lifesaver for your OCD. But honestly, a couple of mushrooms standing alone on a base looks a bit lonely. What really gives this clock its “entwined in the woods” vibe is the greenery climbing up the frame.
To be real with you, the variety of the foliage is what I’m most proud of with this piece. Today, I’m sharing this Crochet Leaf Pattern (and yes, it’s a full-on “dry goods” tutorial) to help you master two completely different styles: the sturdy serrated forest leaf and the dainty, fringed fern.
🛠️ The Essentials of this Crochet Leaf Pattern
Before we pick up the hook, let’s talk shop. We’re sticking with our old reliables: 4-ply milk cotton and a 2.5mm hook. But here is the major difference between leaves and mushrooms: leaves need to hold their shape.
You absolutely need 0.5mm craft wire. A lot of beginners end up with leaves that look like wilted lettuce because they skipped the wire. By “crocheting over” the wire during the final round, you can bend and pose these leaves exactly where you want them on the clock frame.
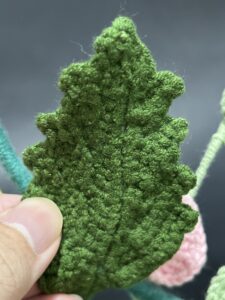
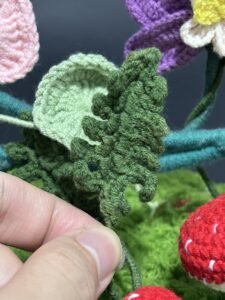
🍃 Style 1: The Serrated Forest Leaf
This one is for that thick, jagged-edge leaf you see in my photos. It looks high-end and complex, but once you find the rhythm, it’s actually quite simple.
First, we create the midrib by starting with 16 chain stitches (16CH). Then, we work all the way around this chain to form the leaf body: Starting from the 2nd chain from the hook, work 1 single crochet (X), 1 half double crochet (T), 1 double crochet (F), then 1 double crochet in each of the next 5 stitches (5F). Finish the side by tapering back down with 1F, 1T, and 1X.
When you hit that very last loop at the end (the tip of the leaf), work (1X, 1CH, 1X) all into that same stitch to make the turn. Then, just mirror everything you did on the other side of the chain.
Now, the magic happens in Round 3: Adding the wire and the serrated edge. Place your wire along the edge and crochet over it using single crochets (X). The pattern is: 2X, then a Picot2 (chain 2, then slip stitch into the first chain). Repeat this all the way around to get that wild, forest-leaf texture. At the very tip (where you made that CH space earlier), make a sharper Picot to really give it that “claws of the forest” look.
🌿 Style 2: The Fringed Fern Leaf
This style is all about being light and airy. It’s basically a central stem with several little “fingers” branching out.
For this one, we want a sturdier spine. Start with 20CH, then work back down the chain with 19 single crochets (19X). Now we’ll work the side branches off this spine, alternating sides every 2 stitches.
The branch method is simple: Slip stitch (SL) into the main stem, then chain outwards. For a natural look, use this length sequence: 8CH for the bottom two branches, 6CH for the middle two, and 4CH for the top two near the tip. Once you’ve chained out, just work slip stitches (SL) back down that chain to reconnect with the main stem.
Pro-tip for symmetry: To get the branches to fan out perfectly on both sides, work your odd-numbered branches (1, 3, 5) on the front of the stitch, then flip the piece over and work the even ones (2, 4, 6) from the back. This way, they naturally spread out without you having to overthink your stitch placement.
✍️ Maker’s Notes
Once you’ve hooked up a few of these, you’re well on your way to finishing that show-stopping clock.
I highly recommend playing with your colors. Use a deep Dark Olive for the large serrated leaves to act as a visual anchor at the bottom. Use a lighter Grass Green for the ferns near the top to keep things feeling airy and fresh.
When you’re finishing the wire, leave a tail of about 5cm (2 inches) at the base of the leaf. Do not cut it short! You’ll need that extra length to twist and secure the leaf onto the clock frame later.
That’s it for this Free Crochet Leaf Tutorial. If you get stuck on the Picots or the “flipping” method for the ferns, just shout in the comments and I’ll help you troubleshoot.